DOF extra & ALF effect 3/13 2015

share shaders here
Post Reply
  • Author
  • Message
Offline
*blah-blah-blah maniac*
Posts: 565
Joined: 05 Apr 2014, 10:29
Location: Taiwan

DOF extra & ALF effect 3/13 2015

This post contains a variety of enbeffectprepass.fx for depth of field effect:

DoF:-------------GPmod & DSLR in one file.
SeperableHex:--performance friendly, only do hexagon, support both GPmod & DSLR.
BokehShape:---support custom aperture pattern.
history versions:
GPmod:-----------based on gp65cj04's dof with extra GUI.
DSLR:------------featuring real lens focusing.

*update 3/13 2015 :
----update DoF, SeperableHex. Fix a bug in ENABLE_GP. (Thanks to the bug report by Confidence Man)
*update 3/11 2015 :
----replace GPmod & DSLR with DoF, a combination of both file along with tons of changes. update Separable Hex, now support both GPmod & DSLR focusing.
*update 3/6 2015 :
----add online dof calculator, check out DoF Calculator section.
*update 12/22 :
----upload performance dof, see Separable Hex section.
*update 12/13 :
----update dof files. replace "=" in string UIName, which will cause .fx.ini overflow.
*update 11/6 :
----upload additional dof file for thin lens model, see DLSR section.
*update 10/29 :
----fix leaking caused by highlighting, fix red tint around focused object, fix increased brightness, fix transverse CA, remove GUI AF sample Range
*update 10/26 :
----update enbeffectprepass.fx , add quality setting, add optical vignette, fix tilt shift func, add tilt shift axis, remove polygon triangle & square, add axial & trans chromatic aberration, add AF cursor, replace brightpass with natural highlight

DoF:
*need a better name for this...
update: 3/13 2015
A combination of my previous GPmod & DSLR version with numerous updates .

Featuring:
  • ingame quality option
  • per-tap chromatic aberration(slow), both axial and transverse
  • post chromatic aberration(fast), both axial and transverse
  • optical vignette for swirling bokeh
  • natural highlight
  • ingame bokeh shape
  • bokeh deformation (polygon to circle)
  • bokeh angle offset
  • bokeh XY ratio for anamorphic lens
  • bokeh bias for "donut" effect
  • adaptive quality, use fewer taps when CoC is relatively small
  • fixed Tilt-Shift with rotational axis
  • both GPmod & DSLR in single file
  • Auto DoF for DSLR ver
  • AF cursor
  • MF_mode to switch between auto and manual focus
Effects:

Code: Select all

#define ENABLE_NOISE                //film grain
#define ENABLE_GAUSSIAN             //post gaussian blur, not recommend to disable
#define ENABLE_TILT_SHIFT           //tilt shift
#define ENABLE_AUTO_DOF             //auto dof
#define ENABLE_CHROMA               //chromatic aberration(slow), quality
#define ENABLE_POST_CHROMA          //chromatic aberration(fast), performance
#define ENABLE_ADAPTIVE_QUALITY     //assign different quality according to CoC size, increase performance
#define ENABLE_GP                   //use gp65cj04's coc calculation
#define ENABLE_VIGNETTE             //optical vignette where bokeh at screen edge are partially obscured
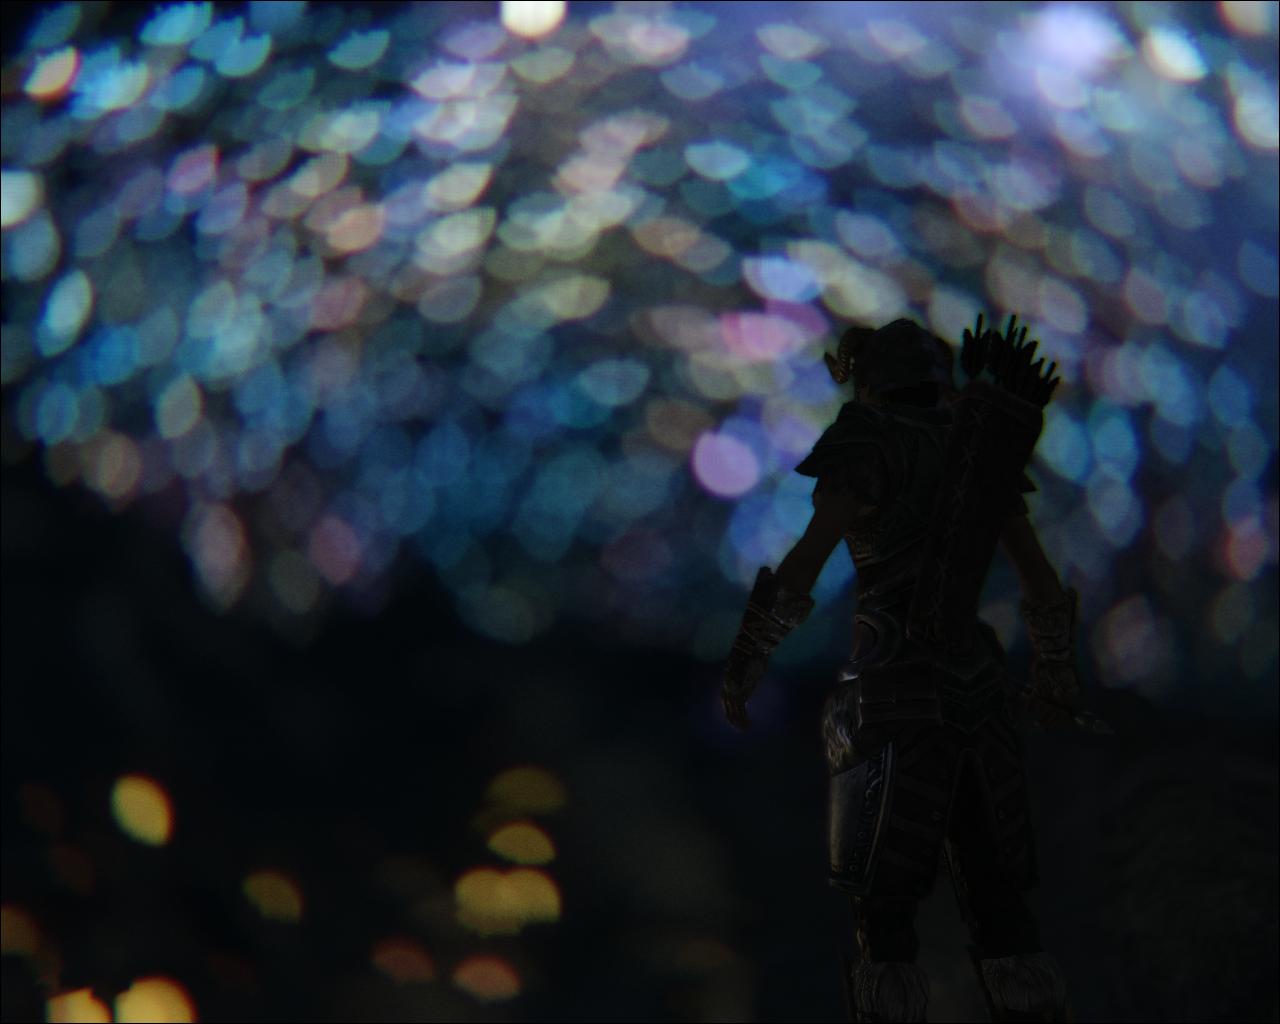
Image
TESV.exe_DX9_20150305_222117 by kingeric1992311, on Flickr
Swirling bokeh

GUI Settings:

Code: Select all

++++++ LENS SETTINGS ++++++
MF mode             //switch between auto/manual focus
Display AF Cursor   //display focus point for AF
AF pos              //(0, 0) at top left corner.

//GPmod controls
AF Near Blur Curve  //scale CoC size in foreground
AF Far Blur Curve   //used to compute Far Blur Plane in AF
MF Far Blur Plane(m)//depth to apply maximum CoC
MF Focused Plane(m) //Manual focused depth
Aperture Size(%)    //CoC Multiplier.
Aperture Deform     //Aperture Shape deformation( 0 == circle, 1 == polygon).
//GPmod ends

//DSLR controls
MF Focused Plane(m) //Manual focused depth
Focal Length(mm)    //Focal length
F_Number            //f-number(f-stop)
//DSLR ends

Aperture Shape      //Aperture shape, polygons
Aperture Ratio      //Aperture xy ratio
Aperture Angle(°)   //Base aperture angle.
Image
Bokeh deformation

Code: Select all

++++++++ AUTO-DOF +++++++++   //Automatically calculate F-number
AD mode             //0 == off( use f-number), 1 == use sample points, 2 == use Near DoF Plane
CoC Size(px)        //CoC Size at sample point( AD mode == 1) or at certain depth (AD mode == 2)
Near DoF Plane(m)   //specified depth to assign AD_Level (AD mode == 2)
Sample Range        //AD_Offset scaling.( AD_Offset is sample points for AD mode == 1)

+++++++ TILT-SHIFT ++++++++   //give an optical illusion of a photograph of a miniature scale model
Tilt Shift Axis(°)  //Rotate tilt axis
Tilt Shift Angle(°) //0 == no tilt shift

+++++ BOKEH SETTINGS ++++++
Quality             //quality, [0, 7]
Bokeh Highlight     // > 1 to increace highlight, < 1 to decreace. (not recommend over 5)
Bokeh Bias          //Brightness of center point
Bokeh Bias Curve    //brightness curve from center to edge
Guassian Radius     //Guassian Size.
Image
Bokeh ratio(old GUI)

Code: Select all

++++ OPTICAL VIGNETTE +++++";   //bokeh vignette, create "swirling bokeh" effect
Vignette Bias   //0 == no vignette.
Vignette Radius //vignette radius, minimum == max CoC.
Vignette Curve  //vignette curve from screen center to screen edge

++++++++++ NOISE ++++++++++";   //Draw noise to blured areas
Noise Amount    //noise amount
Noise Curve     //pow( CoC, Curve)

++++++++++ CHROMA +++++++++   //Axial(longitudinal) & Transverse(lateral) CA
Chroma Curve  (Trans)   //distortion curve
Chroma Amount (Trans)   //distortion at screen edge
Chroma Curve  (Axial)   //distortion curve
Chroma Amount (Axial)   //distortion at bokeh edge
Chroma Red Multiplier   //radius scale for RB color channel
Image
CA, AF cursor, Vignette

Notes:
for DSLR mode:
To get the scale right, you need to set zF, zN manually inside prepass.fx
zF = [SkyrimPerfs.ini]- fBlockMaximumDistance / 100
zN = [Skyrim.ini]------- fNearDistance / 100

You can also set FOV according to focal length. Just open console (~), type "FOV <angle of view>"
check wiki page for angle of view table
enbeffectprepass.fx
DOF-Mar.13.15
(31.53 KiB) Downloaded 4139 times
Please leave comments and make the dof even more awesome.
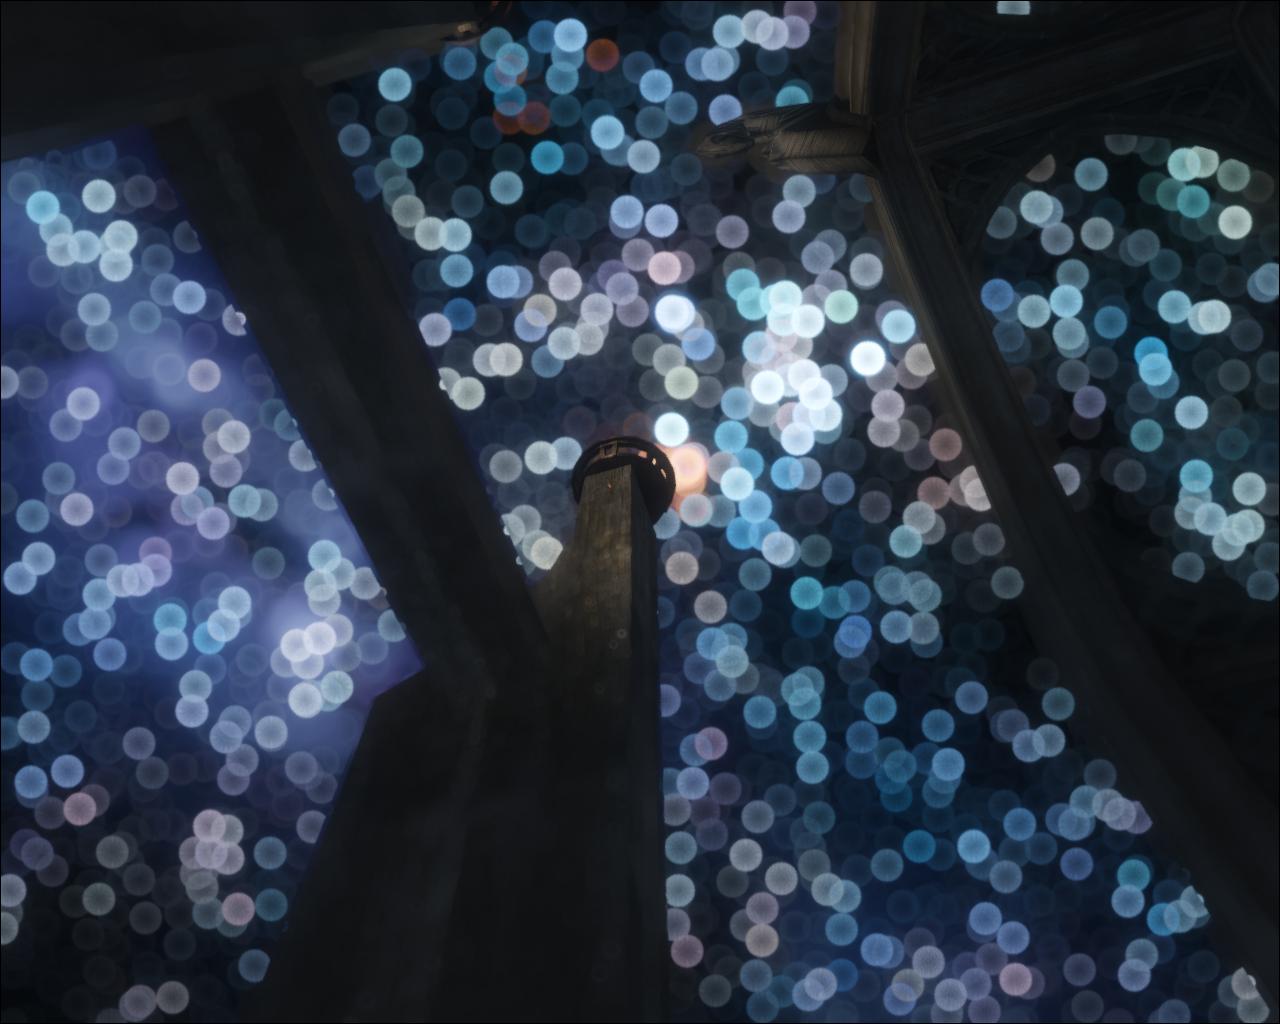
Image
TESV.exe_DX9_20141024_125027 by kingeric1992311, on Flickr

Separable Hex:
update: 3/13 2015
It can only do hexagonal bokeh, controls are identical to DoF.
Should only cost minimum frame rate, but do expect artifacts on certain condition.
enbeffectprepass.fx
Separable Hex-Mar.13.15
(29.45 KiB) Downloaded 2723 times
Image

Custom Shaped Bokeh:
update: 7/10 2014
Image
Image
Image
Image
To enable this, copy enbbokehmask.bmp to skyrim folder and use GUI to set Bokeh Shape = 5

Default DoF quality is 6
GUI options:
Mask Pos X: adjust mask position in X direction
Mask Pos Y: adjust mask position in Y direction
Mask Size: scale mask size

You can also create your own shape by making a enbbokehmask.bmp, the input shape should rotate 180 degree.
the resolution in game is (dof quality x 2) X (dof quality x 2), so for DoF quality = 6, the resolution is 12 x 12.

.rar contains enbeffectprepass.fx and 4 different mask as shown in above screenshots. Rename them to enbbokehmask.bmp to switch between shapes.
Bokeh Shape.rar
(27.51 KiB) Downloaded 3141 times
*Thanks to Insomnia for for loading additional texture code.
todo: eliminate artifact at upper left corner

History Versions:
GPmod: update: 12/13 2014
enbeffectprepass.fx
GP-Dec.13.14
(29.33 KiB) Downloaded 2817 times
DSLR: update: 12/13 2014
enbeffectprepass.fx
DSLR-Dec.13.14
(22 KiB) Downloaded 2575 times
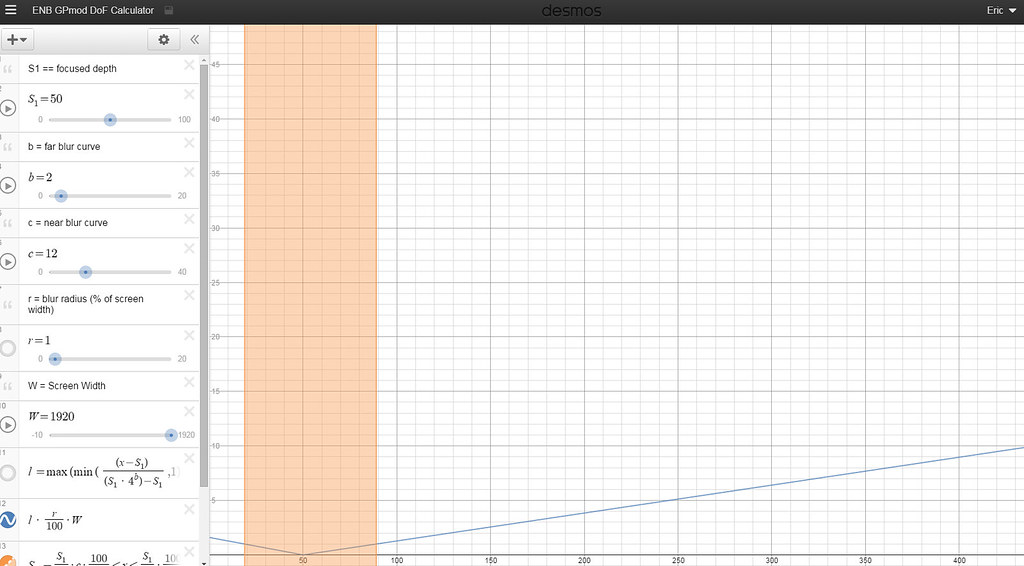
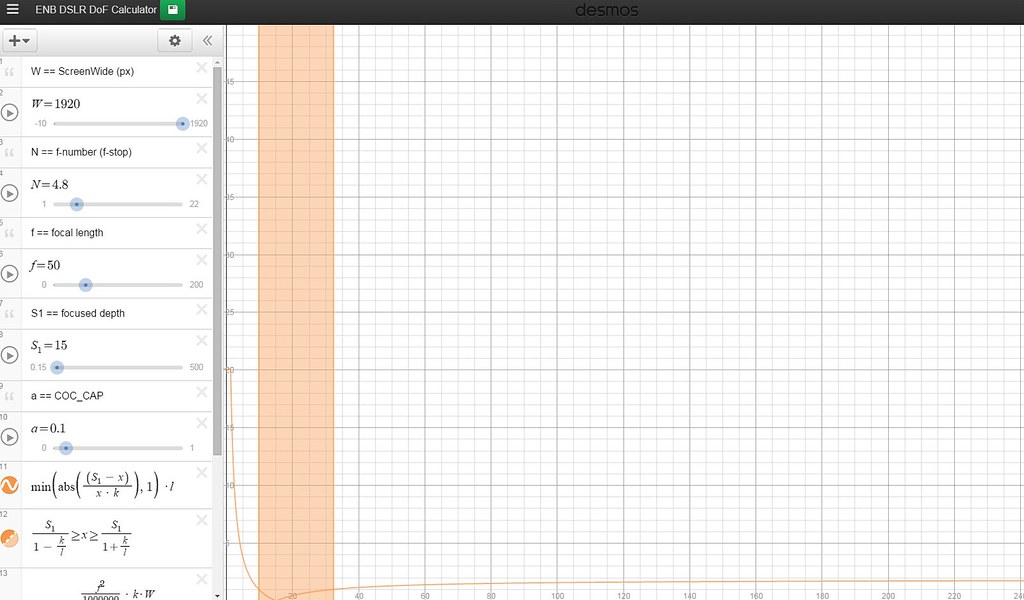
DoF Calculator:
*colored area are depth of field range. (where object in the range will considered clear)

Try those sliders on the left panel to test it out.
GPmod
Link: https://www.desmos.com/calculator/zjrawyrh18
Image

DSLR
Link: https://www.desmos.com/calculator/tlkj3c4la6
Image

Anamorphic Lens Flares:
http://www.mediafire.com/view/8ubce9ebj ... enblens.fx
Image
*Thanks to Kermles for performance tips.

Post Update Log:
*update 3/13 2015 :
re-upload DoF & SeparableHex. Fix a bug in ENABLE_GP. (bug report by Confidence Man)
*update 3/11 2015 :
add "DoF", update SeperableHex, description changes.
*update 3/6 2015 :
add dof calculator link.
*update 12/22 :
upload performance dof.
*update 12/13 :
update dof files. replace "=" in string UIName, which will cause .fx.ini overflow.
*update 11/6 :
upload additional dof file for thin lens model
*update 10/29 :
fix leaking caused by highlighting, fix red tint around focused object, fix increased brightness, fix transverse CA, remove GUI AF sample Range
*update 10/26 :
update enbprepass.fx , add quality setting, add optical vignette, fix tilt shift func, add tilt shift axis, remove polygon triangle & square, add axial & trans chromatic aberration, add AF cursor, replace brightpass with natural highlight
*update 7/10 :
add custom bokeh shape.
*update 6/25 :
add enblens.fx with ALF
Last edited by kingeric1992 on 12 Mar 2015, 16:57, edited 29 times in total.
_________________
Intel Xeon L5639 6C12T @3.96GHz | Gigabyte ga-x58a-ud3r | MSI GTX680 4G | 48G RAM | Intel 760p Nvme w clover bootloader
Flickr
YouTube

Offline
User avatar
*blah-blah-blah maniac*
Posts: 530
Joined: 30 Jan 2012, 13:18

Re: enbeffectprepass.fx with some extra GUI

Wow great work! Concerning the ALF, I could maybe help. I got a similiar solution but yours looks smoother.

Offline
User avatar
*blah-blah-blah maniac*
Posts: 1938
Joined: 05 Mar 2012, 02:08

Re: enbeffectprepass.fx with some extra GUI

A very nice contribution to ENB community you have done here kingeric1992.
I really dig the bokeh effect options :)

The ALF also looks appealing, and like I actually want to use such an effect now, which would be a first actually :D

Offline
*blah-blah-blah maniac*
Posts: 565
Joined: 05 Apr 2014, 10:29
Location: Taiwan

Re: enbeffectprepass.fx extra GUI & enblens.fx ALF effect

Thanks for replies, just add the enblens.fx file

most parameters are self explained, FlareCurve is to determine the length of the flare.

the only tricky part is the bright pass.
the light level is constantly changing, but the thresholds do not. Meaning that if I set the threshold base on some mid range fire, the effect will be too intense when I walk towards the light source.

I am thinking that a dynamic tone map that can shift upon overall brightness may help, but is it possible to achieve that in enblens.fx?

Offline
*sensei*
Posts: 372
Joined: 28 Jul 2013, 23:26

Re: enbeffectprepass.fx extra GUI & enblens.fx ALF effect

kingeric1992 wrote: I am thinking that a dynamic tone map that can shift upon overall brightness may help, but is it possible to achieve that in enblens.fx?
only possible in enbeffect.fx because you need adaptation texture for that, which contains the average screen brightness. So unless Boris makes that texture available or makes texDepth available (so you can base the effect strength on distance) in enblens.fx, you'll have to find another way around that. Tonemap to limit max intensities may still help though...

I personally don't like brightpass too much... I use a technique based on Photoshop's levels control for it, which suits me well... perhaps you can give that a try, here it is:

Code: Select all

//inBlack range 0.0 - 1.0, default 0.0
//inWhite range 0.0 - 1.0, default 1.0
//inGamma range 0.01 - 10.0, default 1.0
//outBlack range 0.0 - 1.0, default 0.0
//outWhite range 0.0 - 1.0, default 1.0

color.xyz 	= pow( max( color.xyz - inBlack , 0.0f ) / max( inWhite - inBlack, 0.0001f ), inGamma ) * max( outWhite - outBlack, 0.0001f ) + outBlack;

Offline
User avatar
*sensei*
Posts: 446
Joined: 17 Apr 2014, 22:12
Location: Schweden

Re: enbeffectprepass.fx extra GUI & enblens.fx ALF effect

Love the DoF! Thanks for sharing! :) Poste a shot with it in the gallery. ;)
_________________
| i5 3350p @3.1 | 16 GB RAM | GTX1060 | Skyrim on SSD |
My Flickr
My Soundcloud
CGI ENB

Offline
*blah-blah-blah maniac*
Posts: 565
Joined: 05 Apr 2014, 10:29
Location: Taiwan

Re: enbeffectprepass.fx extra GUI & enblens.fx ALF effect

@prod80
Thanks for the code, though I haven't test it yet.

@Insomnia
Looks great, but what I really did is just adding more options for ingame adjustment.

Regarding the ALF, I tried to use this function to roughly get the average luminance

Code: Select all

float3 Lumi()
{
	float2 tex = 0;
	float3 DarkSample = 1;
	float3 BrightSample = 0;
	float3 AvgSample =0;
	
	for( int j = 0; j < 8; j++)
	{		
		for ( int i = 0; i < 16; i++)
		{			
			float3 ALFtemp = tex2D(SamplerBloom2, tex).rgb;
			BrightSample.xyz = max(ALFtemp, BrightSample);
			DarkSample.xyz = min(ALFtemp, DarkSample);
			AvgSample += ALFtemp;

			tex.x += 0.0625;
		}
		tex.y += 0.128;
	}	
	AvgSample /=125;
	
	float AvgLumi = dot(AvgSample, float3(0.212, 0.716, 0.072));
	float DarkLumi = dot(DarkSample, float3(0.212, 0.716, 0.072));
	float BrightLumi = dot(BrightSample, float3(0.212, 0.716, 0.072));
	
	return float3(DarkLumi, AvgLumi, BrightLumi);
}
It will cost some frames, but I am getting some promising result.
I'm still testing some math adapting this to the bright pass.

Offline
User avatar
*sensei*
Posts: 446
Joined: 17 Apr 2014, 22:12
Location: Schweden

Re: enbeffectprepass.fx extra GUI & enblens.fx ALF effect

Ah ok. Looks great anyway. :)
I added some sharpening.

Image
_________________
| i5 3350p @3.1 | 16 GB RAM | GTX1060 | Skyrim on SSD |
My Flickr
My Soundcloud
CGI ENB

Offline
*master*
Posts: 117
Joined: 22 Feb 2013, 03:33

Re: enbeffectprepass.fx extra GUI & enblens.fx ALF effect

I don't know what your code looks like now, but I think I had to figure out something like your brightness threshold a while ago also.

If you do this:

Code: Select all

BrightnessThreshold = max(0.0f, (1.0f / max(0.0001f, (BrightnessThreshold * dot(ALFTexColor.rgb, float3(0.299f, 0.587f, 0.114f))))));
It will make your brightness threshold scale smoothly with brightness no matter the scene's light levels, but its sensitivity will still be configurable, high values = more sensitive to brightness/lower "threshold". The final value is between 0 and 1 always so you can flip it with 1-BrightnessThreshold if necessary. Then it might work well to use a pow() function with BrightnessThreshold as the exponent to apply/trigger your ALF somehow as that avoids harsh cutoffs and difficult configuration that you get with linear operations, but I dunno what your code is doing so I am not sure if/how that would work for you.

I am no expert, but I am not sure if you need to calculate the whole frame luminance ranges and averages for what you are doing, because the purpose of that would be that something is *always* triggering ALF, right? Is that really what you are after? They could be fed into a more complex tonemapping operator, but that is maybe overdoing it for ALF in ENB. Per-pixel brightness is good enough unless you want to be dynamically readjusting the threshold even for scenes that have nothing bright enough that they would realistically trigger a flare; at least that's how I see it but maybe I am off.

Edit: prod80's code does much the same thing as mine when all is said and done but with configurable cutoff points (however doesn't consider luma), missed that.

Offline
*blah-blah-blah maniac*
Posts: 565
Joined: 05 Apr 2014, 10:29
Location: Taiwan

Re: enbeffectprepass.fx extra GUI & enblens.fx ALF effect

@Kermles
Thanks for the function, but I think the output does not always ranged from 0~1, not if the following is greater than 1.

Code: Select all

 max(0.0001f, (BrightnessThreshold * dot(ALFTexColor.rgb, float3(0.299f, 0.587f, 0.114f))

I suppose the concept is to make the threshold base on the luminance of current point. It will definitly more efficient than calculate the whole screen, but simple copy and paste does'n work, so I'm still trying to adapt the function.

The newest version of bright pass is this:

Code: Select all

float3 BrightPass(float2 tex, float FlareThreshhold)
{
	float3 c = tex2D(SamplerBloom2, tex).rgb;
	float lum = dot(c, float3(0.212, 0.716, 0.072));
	
	float MaxLumi = lerp(0, MaxLumi, lum), 1.2);
	//incase sample point didn't get the brightest spot
	
	float threshold =lerp(AvgLumi, MaxLumi, lerp(TempVaribale1, 1, FlareThreshhold));
	//dynamic threshold, constant ratio between AvgLumi and MaxLumi.  TempVaribale1 used to increace accuracy
	
	float lum2 = lerp( 0, lum, step(max(threshold, TempVaribale2), lum));
	//TempVaribale2 as Absolute threshold.

	return c*= lum2 / lum;
}
I use relative threshold so that the threshold will be at constant ratio between average and maximum luminance, and there is also a absolute threshold in case in a dark scene.

The things is that the average luminance is unstable depending on whether the bright spot is sampled or not, so the flare will flicker badly.
Post Reply